How to Connect Wagtail and React

Integrating Django/Wagtail with React Hooks using Wagtail’s v2 API and Axios
Thinking about using your Python’s Django skills to create a blog but want to use Javascript’s React as your frontend? I will share with you what the method I used. To connect Wagtail (backend) with React (frontend), we have to use Wagtail’s v2 API and Axios.

Assuming you’ve already had Python and Node.js installed, let’s start from the very beginning by activating virtual environment. Setup may be different, I use Visual Studio Code.
Activate venv on Visual Studio Code:
Create a folder, eg. mysite, it can be of any name. Then open this folder in your terminal.
> python -m venv mysite\env\Scripts> cd [insert the folder containing activate.bat, ie. mysite\env\Scripts\Scripts]> .\activate
Let’s set up Wagtail. These are the same steps as on Wagtail’s website.
Install WagTail:
> pip install wagtailCreate WagTail project:
> wagtail start mysite> cd mysite> pip install -r requirements.txt> python manage.py makemigrations> python manage.py migrate> python manage.py createsuperuser· Username: admin· Email address: admin@admin.com· Password: 123> python manage.py runserver
To stop server after python manage.py runserver, do Ctrl+C.
Install Django-CORS-Headers package
In your terminal, first install django-cors-headers in mysite/mysite.
> cd mysite\mysite> pip install django-cors-headers
In your mysite/mysite/mysite/settings/base.py, add to
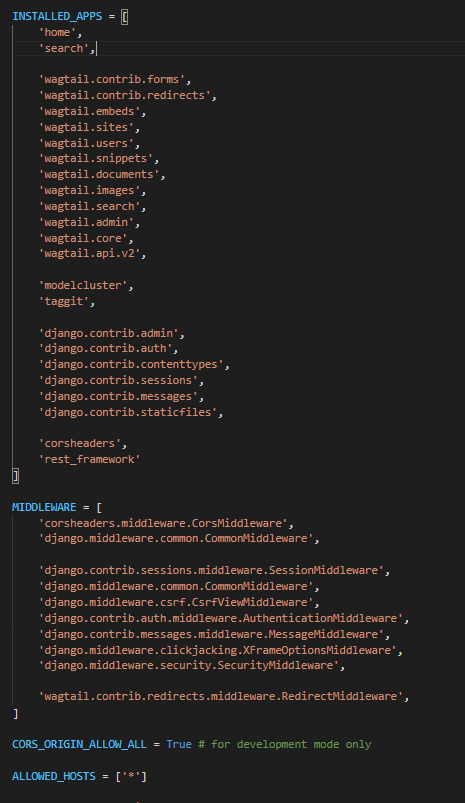
Step 1: INSTALLED_APPS
INSTALLED_APPS = [ ‘wagtail.api.v2’, … ‘corsheaders’, ‘rest_framework’]
Step 2: MIDDLEWARE
MIDDLEWARE = [ ‘corsheaders.middleware.CorsMiddleware’, ‘django.middleware.common.CommonMiddleware’,…]
Step 3: CORS_ORIGIN_ALLOW_ALL and ALLOWED_HOST
This setting is for the current development mode we’re in. It’s another story when it comes to production mode.
CORS_ORIGIN_ALLOW_ALL = True # for development mode onlyALLOWED_HOSTS = [‘*’]
All in all, it should look something like this:
We’re pretty much done at this point. You can continue on if you want to see how this plays out. It’s optional :)
Following Wagtail’s documentation:
WagTail’s Part
Populate your model. This is an example model in mysite/mysite/home/models.py.
mysite — this folder is the one we created in the very beginning (Activate venv on Visual Studio Code: Create a folder). This folder contains subfolders env and mysite.
mysite — this subfolder is the one created when we run > wagtail start mysite.
home — you don’t have to create this folder, it is already there. Look for it.
home/models.py
from django.db import modelsfrom wagtail.core.models import Pagefrom wagtail.core.fields import RichTextFieldfrom wagtail.admin.edit_handlers import FieldPanel, PageChooserPanelfrom wagtail.images.edit_handlers import ImageChooserPanel
class HomePage(Page):    template = "home/home_page.html"    max_count = 1 #"""No child page for homepage."""    banner_title = models.CharField(max_length=100, blank=False, null=True, default="Title not added")    banner_subtitle = RichTextField(features=["bold", "italic"], default="SubTitle not added")    banner_image = models.ForeignKey(        "wagtailimages.Image",        null=True,        blank=False,        on_delete=models.SET_NULL,        related_name="+" #"""Not using any related name, just using field name"""    )    banner_cta = models.ForeignKey(        "wagtailcore.Page",        null=True,        blank=False,        on_delete=models.SET_NULL,        related_name="+" #"""Not using any related name, just using field name"""    )    content_panels = Page.content_panels + [        FieldPanel("banner_title"),        FieldPanel("banner_subtitle"),        ImageChooserPanel("banner_image"),        PageChooserPanel("banner_cta")    ]class Meta:    verbose_name = "Home Page"    verbose_name_plural = "Home Pages"
In mysite/mysite/mysite containing manage.py file, migrate.
> py manage.py makemigrations> py manage.py migrate
api.py
In mysite/mysite/mysite, first create api.py file.
And in mysite/mysite/mysite/api.py :
from wagtail.api.v2.views import PagesAPIViewSetfrom wagtail.api.v2.router import WagtailAPIRouterfrom wagtail.images.api.v2.views import ImagesAPIViewSetfrom wagtail.documents.api.v2.views import DocumentsAPIViewSet
# Create the router. “wagtailapi” is the URL namespaceapi_router = WagtailAPIRouter(‘wagtailapi’)# Add the three endpoints using the “register_endpoint” method.# The first parameter is the name of the endpoint (eg. pages, images). This# is used in the URL of the endpoint# The second parameter is the endpoint class that handles the requestsapi_router.register_endpoint(‘pages’, PagesAPIViewSet)api_router.register_endpoint(‘images’, ImagesAPIViewSet)api_router.register_endpoint(‘documents’, DocumentsAPIViewSet)
urls.py
mysite/mysite/mysite/urls.py :
from django.conf import settingsfrom django.urls import include, path, re_pathfrom django.contrib import adminfrom wagtail.admin import urls as wagtailadmin_urlsfrom wagtail.core import urls as wagtail_urlsfrom wagtail.documents import urls as wagtaildocs_urlsfrom search import views as search_viewsfrom .api import api_router
urlpatterns = [    path(‘django-admin/’, admin.site.urls),    path(‘admin/’, include(wagtailadmin_urls)),    path(‘documents/’, include(wagtaildocs_urls)),    path(‘search/’, search_views.search, name=’search’),    path(‘api/v2/’, api_router.urls),    # Ensure that the api_router line appears above the default Wagtail page serving route


    # re_path(r'^', include('blog.urls')),    re_path(r’^’, include(wagtail_urls)),]
if settings.DEBUG:    from django.conf.urls.static import static    from django.contrib.staticfiles.urls import staticfiles_urlpatterns    # Serve static and media files from development server    urlpatterns += staticfiles_urlpatterns()    urlpatterns += static(settings.MEDIA_URL, document_root=settings.MEDIA_ROOT)    urlpatterns = urlpatterns + [    # For anything not caught by a more specific rule above, hand over to    # Wagtail’s page serving mechanism. This should be the last pattern in    # the list:    path(“”, include(wagtail_urls)),    # Alternatively, if you want Wagtail pages to be served from a subpath    # of your site, rather than the site root:    # path(“pages/”, include(wagtail_urls)),]
Now we’ll be filling in our blog app.
Create blog app using
> python manage.py startapp blogAdd blog.apps.BlogAppConfig to INSTALLED_APPS in mysite/mysite/mysite/settings/base.py
INSTALLED_APPS = [ ‘home’, ‘search’, ‘blog.apps.BlogConfig’,]
blog/models.py
from django.db import modelsfrom wagtail.core.models import Pagefrom wagtail.admin.edit_handlers import FieldPanelfrom wagtail.api import APIField
class Blog(Page):    description = models.CharField(default=’’, max_length=200)    published = models.BooleanField(default=False)    content_panels = Page.content_panels + [        FieldPanel(‘title’),        FieldPanel(‘description’),        FieldPanel(‘published’),    ]
    api_fields = [        APIField(‘title’),        APIField(‘description’),        APIField(‘published’)    ]
Don’t forget, as usual, to migrate
> py manage.py makemigrations> py manage.py migrate
blog/serializers.py
from rest_framework import serializersfrom blog.models import Blog
class BlogSerializer(serializers.ModelSerializer):    class Meta:        model = Blog        fields = ('title', 'description', 'published')
That’s all for Wagtail’s side. You can run Wagtail on localhost port 8000.
python manage.py runserverThe url for admin is localhost:8000/admin.
Here you can put a new blog entry.
To access API of pages, the url is localhost:8000/api/v2/pages .
To access other fields, try localhost:8000/api/v2/pages/?type=blog.Blog&fields=published,description .
React’s Part
Assuming you already have node.js installed, start by opening folder mysite/mysite. Create React app using create-react-app and naming it frontend.
npx create-react-app frontendIn mysite/mysite/frontend, install the packages, axios and react-router-dom using npm install or yarn add.
npm install axios react-router-dom styled-componentsIn app.js
import React, { useState, useEffect } from “react”;import styled from ‘styled-components’;import axios from ‘axios’;
axios.defaults.baseURL = process.env.REACT_APP_API_URL
const Wrapper = styled.h1``;
function App() {    const [blog, setBlog] = useState([]);    useEffect(() => {        axios.get(`/4`).then((response) => {            setBlog(response.data);            console.log(blog)        });    }, []);    return (        <Wrapper>            <p>Hi {blog.title}</p>        </Wrapper>    );}export default App;
Under mysite/mysite/frontend, create a file named ‘.env.development’.
.env.development
And in the file
REACT_APP_API_URL=http://localhost:8000/api/v2/pagesThis supplies the REACT_APP_API_URL in axios.defaults.baseURL = process.env.REACT_APP_API_URL from App.js.
Run servers
By splitting terminal (running both together)
Run Wagtail (localhost port 8000) using
python manage.py runserverRun React (localhost port 3000) using
npm startIf your blog’s title appears then it works.
I’ll make a video tutorial and a github repository….after I take my rest. I’ll come back and edit this tutorial as I go.